How to Drill into a Stud Safely and Efficiently
Drilling into a stud incorrectly can weaken wall structure, damage hidden wires, or cause hanging items to fall. This guide ensures your project is safe, code-compliant, and long-lasting. This article will guide you a detailed step-by-step process to drilling into a stud safely and efficiently.
Table of Contents
Why Drill Into a Stud
Core Objectives
- Load-Bearing Anchoring: Gypsum board (drywall) lacks structural strength to support heavy items. Drilling into wood studs or metal studs provides a secure anchor point, ensuring stable mounting of televisions, cabinets, bookshelves, and other heavy fixtures, eliminating risk of detachment.
- Pre-Installation Planning: Precise drilling allows for concealed routing of air conditioning refrigerant lines, range hood exhaust ducts, gas water heater vents, and bathroom exhaust fans—maintaining aesthetic integrity and functional efficiency while avoiding post-construction wall damage.
- Structural Enhancement: In ceiling and partition wall construction, drilling and fastening stud framing enables spatial division and load distribution, significantly improving overall structural rigidity.
Primary Advantages
- Enhanced Safety: Anchors secured directly into studs can withstand tensile forces far exceeding those of drywall alone (recommended screw penetration ≥25 mm into stud), drastically reducing the risk of falling objects.
- Aesthetic Concealment: Pre-drilling during renovation allows for hidden wiring and clean mounting surfaces, avoiding visible patchwork, color mismatches, or surface irregularities from later modifications.
- Precision Installation: Using a professional stud finder to locate stud centers (wood studs typically spaced at 400 mm; metal studs at 300–600 mm) ensures mounting occurs at the strongest structural zone, maximizing holding power.
High-Risk Scenarios – Strict Warnings
- Do NOT drill into load-bearing walls, above gas pipes, or near electrical panels.
- Never rely solely on drywall anchors or expansion bolts for loads exceeding 15 kg.
- Must complete all pre-drilled holes before tiling or painting—post-finishing modifications severely compromise appearance and structural integrity.
Step 1. Prepare Your Tools and Workspace for Drilling into A Stud
Collect all of the materials listed as follows. To avoid disruptions during the operation, make sure your power drill is charged or has new batteries. Clear the space surrounding the wall where you’ll be drilling, removing any impediments to your job.
Materials Needed
- Stud finder
- Pencil or marker
- Power drill
- Drill bit suitable for the size of the screw or anchor you’ll be using
- Tape measure
- Level
Step 2. Locate the Stud for Drilling into
Slide a stud finder across the wall untill it notices the presence of a stud. Once a stud is detected, most stud finders will make some sort of sound or flicker lights . Mark the outer edges of the stud with a pencil or a marker, not too hard. To make it more precise, move the stud finder straight along the wall, like horizontally, so you can find the stud’s full width, basically.
Step 3. Measure and Mark the Point for Drilling into A Stud
1. Determine the Mounting Location
Pick a spot on the wall where the item will go, or where it will hang. If you need to, use a level, and make sure its not tilted or crooked, aligned with other nearby objects, fixtures too.
2. Measure the Desired Height
Measure the distance from the floor or some reference point (like the top of a cabinet) to the position you want the center of your object to be. Use a tape measure, write down the number so you can return to it later.
3. Find the Stud Center
Find the middle of the stud at the spot you plan to drill. Go back to your notes, and when you are placing multiple items across the wall, make certain you measure the gap between each one, and not just the overall span.
4. Mark the Drilling Point
Once you have the stud center, place a small light mark on the wall with a pencil or marker. If the wall is light, pencil is best, if it is darker then use a marker so you can see it clearly.
5. Double-check Measurements
Before drilling, check your measurements and the markings again, really. Make sure the mark is straight too, and at the proper height by using a level. Then, if it seems needed , double check that the drilling point lines up with other items or fixtures in the room, not just with your plan.
6. Considering Offsetting the Hole
If you are using a larger anchor or screw, you might want to nudge the drilling point a little, nearer to the stud edge. Instead of going straight into the center. This can make heavier goods stay more stable.
7. Use Masking Tape
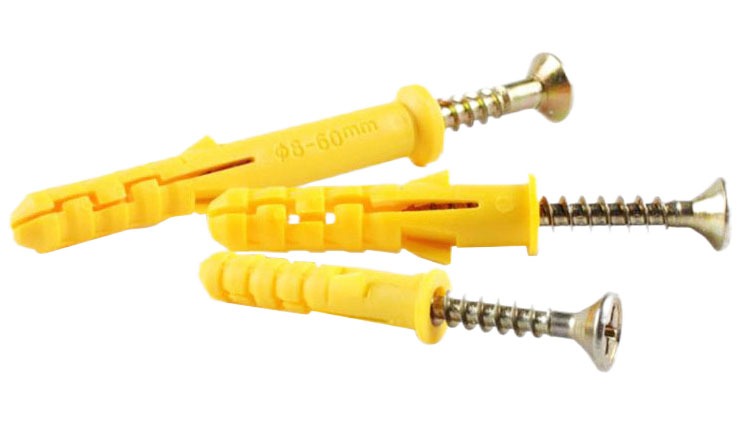
To avoid accidental wall damage, put a small piece of masking tape directly over the drilling spot. The tape can help prevent drywall from crumbling or splintering while drilling.
8. Set Up the Drill
Put your chosen drill bit into your power drill, and make sure it is fitted tight, before you start.
Step 4. Process of Drilling into A stud
Place the drill bit’s tip precisely in the designated position. As you begin drilling, keep the drill perpendicular to the wall and apply steady, equal pressure. To avoid breaking the stud or allowing the drill to slip, choose a medium speed setting.
Check the depth
Drill to the appropriate depth, which should be somewhat longer than the length of the screw. Wrap a piece of tape around the drill bit at the specified depth as a visual guide to prevent over-drilling.
Insert the screw or anchor
Remove the drill bit from the hole after drilling and be ready to insert the screw or anchor. If you’re using a screw, insert it into the hole clockwise until it’s securely fastened in the stud. For screw anchors, gently tap them into the hole with a hammer until they are flush with the wall.
Check for stability
After the screw or anchor is finally in place, give it a gentle tug, just to see if it feels securely fastened to the stud. If it doesn’t wobble then it’s stable. You’ve effectively drilled into the stud if everything stays put.
Supplementary Details
- Drilling Techniques for Different Scenarios: For heavy loads (≥50 lbs, e.g., floating shelves), drill two holes at the top and bottom of the stud, spaced 16 inches apart, to distribute weight evenly.
- Material Differences Explanation: Metal studs require a cobalt drill bit (not high-speed steel) to prevent overheating and bit breakage; use a slow drill speed (≤500 RPM) for clean holes.
Summary
Drilling into a stud is a necessary skill for pretty much any DIY project that needs wall fasteners or heavier installations. You can ensure a secure and steady setup by following our step-by-step walkthrough and by taking the time to precisely locate the stud. Always stress safety, use the right tools, and move forward carefully, so you get dependable results each time.
