How to Install Lock Nuts Effectively?
A bolt without a proper lock nut is like a door without a lock; it may hold for a while, but vibration, thermal cycling, or dynamic loads will eventually loosen it. At KENENG Hardware, we manufacture precision lock nuts (nylon‑insert, all‑metal prevailing torque, and flange lock nuts) that meet DIN, ANSI, and ISO standards. This guide not only walks you through the correct installation procedure, but also helps you choose the right type and avoid common pitfalls for a truly vibration‑proof connection.

What are Lock Nuts?
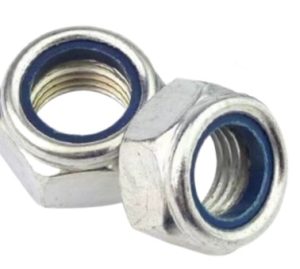
Lock nuts are a type of fastener with a distinctive design that prevents them from loosening over time. They are frequently utilized in situations where vibration, motion, or external pressures could cause conventional nuts to come loose. Self-locking nuts accomplish this by creating friction or distortion in the threaded connection, making it more resistant to accidental loosening.
| Lock Nut Type Performance Comparison Matrix | |||||
| Type | Locking Principle | Reusable | Temperature Range | Anti-Vibration Performance | Recommended Application Scenarios |
| Nylon-Insert Lock Nut | Friction generated by deformation of the nylon ring | ❌ Not recommended for reuse (nylon will fail) | -50°C ~ +120°C | Medium-High | Electronic equipment, home appliances, general industrial machinery |
| All-Metal Prevailing Torque Lock Nut | Elastic deformation from elliptical/slotted thread design | ✅ Reusable 2-3 times (slight torque decrease) | -200°C ~ +600°C | Very High | Engines, exhaust systems, high-temperature pipelines, aerospace |
| Flange Lock Nut | Flange surface + thread deformation, increased contact area | ✅ Reusable | Depends on material (metal can withstand high temperatures) | High | Automotive chassis, heavy equipment, high-vibration environments |
Selection Recommendations:
• For low cost and moderate vibration damping: Nylon embedded type (Note: Not suitable for high temperature or highly corrosive environments)
• For high temperature, strong vibration, and detachable operation: All-metal torque type (KENENG offers stainless steel/alloy steel materials, torque retention rate >85%, tested for 1000 vibration cycles)
• For anti-loosening + sealing + scratch resistance: Flange lock nut (with built-in washer effect)
Detailed Guide to Installing Lock Nuts (8 Steps with Pro Tips)
Tools and Materials You’ll Need
Before you begin the installation process, gather the following tools and materials:
- Lock Nuts: Choose the appropriate type (see table above).
- Torque Wrench (recommended) rather than a standard wrench – critical for preventing over‑tightening.
- Thread Lubricant / Anti‑Seize: Especially for stainless steel lock nuts to prevent galling.
- Thread Gauge (optional): To verify bolt thread pitch matches the lock nut.
Step 1: Prepare the Threaded Fastener
Check to make sure the threaded fastener (bolt or threaded rod) is clean and free of debris, rust, or old thread locker. Use a wire brush or solvent if needed. Even a small speck of dirt can increase false torque readings, causing under ‑ tightening.
Step 2: Choose the Right Lock Nut (Expanded)
Beyond thread size and material, consider:
- Prevailing torque value: Different lock nuts require different initial tightening resistance. KENENG lock nuts are 100% torque‑tested before shipping.
- Surface finish: Zinc plating for indoor, dacromet/geomet for corrosion resistance (salt spray >500h), or plain finish for high‑temp applications.
Step 3: Position the Lock Nut
Turn the lock nut clockwise onto the fastener. Always start by hand to avoid cross‑threading. Cross‑threading is the #1 installation mistake. If you feel resistance after 1-2 turns, back off and realign.
Step 4: Hand-Tighten the Lock Nut
Tighten the lock nut by hand until it is snug against the workpiece or the previously inserted nut. For nylon‑insert nuts, hand‑tighten until the nylon ring engages the threads (you will feel a slight increase in resistance). Do not use power tools at this stage.
Step 5: Use a Torque Wrench (Not Just a Wrench)
Using a torque wrench is highly recommended, especially for prevailing torque lock nuts.
Standard wrenches cannot measure torque, leading to under‑tightening (loosening risk) or over‑tightening (thread stripping/locking feature damage).
KENENG lock nuts provide recommended torque values (e.g., for an M10 grade 8 nut: 40-50 N·m). Follow manufacturer guidelines.
Step 6: Apply Thread Lubricant – When and Why
Thread lubricant or anti‑seize compound is not always required, but in certain cases, it improves installation:
- Stainless steel on stainless steel – high risk of galling (cold welding). Use anti‑seize.
- High clamping force applications – lubricant reduces friction scatter, resulting in more consistent preload.
Caution: Lubricant reduces friction, so the same torque will produce higher bolt tension. Reduce applied torque by 15‑20% if lubricated (unless specified otherwise).
Do not lubricate nylon‑insert lock nuts; lubricant may degrade the nylon ring and reduce locking effectiveness.
Step 7: Check for Proper Tightening
After tightening, double-check that the lock nut is securely fastened. Visual check the nut should be flush against the workpiece with no gap. For prevailing torque nuts, you can try to back them off by hand (they should not move without a wrench).
Step 8: Test the Connection (If Applicable)
If possible, apply a light vibration or dynamic load to verify the connection remains tight. KENENG offers vibration test reports (per DIN 65151) on request; our lock nuts maintain >80% of initial preload after 30,000 vibration cycles.
What are Useful Tips and Considerations to Ensure the Proper Installation?
Alignment & Thread Fit
Misalignment causes uneven locking and premature wear. Use a thread gauge when mixing different brands of bolts and nuts.
Use the Correct Tools
- Do not use a pipe wrench or pliers; they damage the nut’s hex corners.
- 12‑point sockets are preferred for tight spaces, but ensure proper fit.
Torque Values – Crucial Parameter
- Under‑tightening: The locking mechanism may not fully engage, and vibration can easily loosen the nut.
- Over‑tightening: Stripped threads, cracked nylon ring (for nylon‑insert), or permanent deformation of the metal locking feature
KENENG’s recommendation: Always use a calibrated torque wrench. If the exact value is unknown, start with 70% of the standard nut torque and increase gradually until the locking effect is felt.
Avoid Over-Tightening – Why It’s Especially Critical for Lock Nuts
- For nylon‑insert nuts, over‑tightening can shear the nylon ring, turning it into a plain nut.
- For all‑metal lock nuts, over‑tightening can flatten the elliptical thread form, permanently reducing prevailing torque.
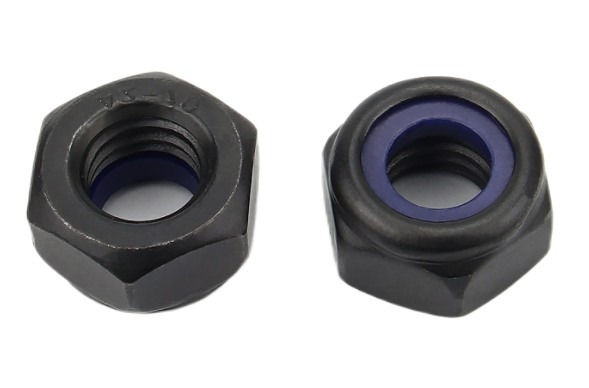
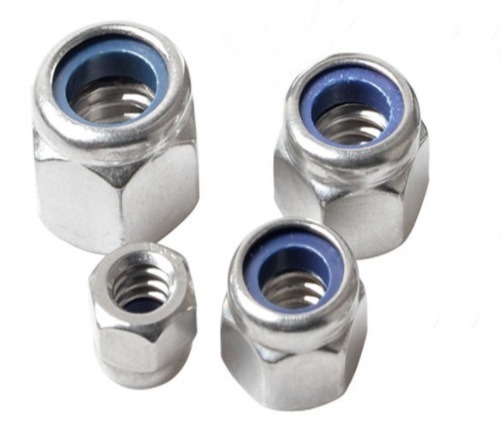
Single-Use Nuts (Nylon-Insert) – Do Not Reuse
Because the nylon insert may lose its effectiveness after first installation, nylon-insert lock nuts are primarily designed for single-use applications. These lock nuts should not be reused. If you must reuse (temporary assembly), check that the nylon ring still provides resistance when turned by hand; if it spins freely, discard.
All-Metal Lock Nuts – Limited Reusability
Can be reused 2-3 times under moderate torque. After each reuse, measure the prevailing torque (the torque needed to run the nut down the threads). KENENG recommends replacement when prevailing torque drops below 50% of initial value.
Multiple-Layer Installations (Stacked Lock Nuts)
For consistent locking, ensure that the prevailing torque feature of each nut faces the same direction. Example: If using two all‑metal lock nuts on a long threaded rod, orient both with the distorted thread section toward the workpiece.
Environmental Considerations
- High Temperature (>120°C): Use all‑metal lock nuts (nylon will melt).
- Chemical Exposure (oils, solvents): Nylon can swell or degrade; choose all‑metal or coated versions.
- Corrosive Environment: Select stainless steel or with dacromet coating (Keneng provides salt spray test reports up to 1000h).
Conclusion
At Keneng Hardware, we don’t just sell lock nuts – we provide engineering support to help you select, install, and verify the right locking solution. Our strengths include:
- Full Range: Nylon‑insert, all‑metal prevailing torque, flange lock nuts – M3 to M64, inch sizes also available.
- Quality Control: 100% torque testing, dimensional inspection per DIN/ANSI/ISO, material certificates upon request.
- Custom Finishes: Zinc plating, dacromet, geomet, Xylan coating, and plain for high‑temp.
- Fast Sample Delivery: Free evaluation of your vibration environment – we recommend the optimal lock nut type and installation torque.
Need help with a critical bolted joint? [Contact KENENG Hardware] for expert advice and reliable lock nuts that stay tight.